


How to Use Cemu - Wii U Emulator
Confused on how to get started in Cemu? Take a look at this guide!


In order to follow this guide you will need to download Cemu - Wii U Emulator. Please click the green button below.
1. Before you start playing games
Before doing anything, you should download Cemuhook here. This adds a ton of important functionality to the program, such as extended CPU menu options, letting you set up a gyro-enabled device to use with motion control games, fix in-game cutscenes on various titles, and letting you fast forward or slo-mo a game under the debug menu. Installing it is easy - just unzip the DLL files from the archive into your CEMU folder, right next to the executable.
There are also a ton of little PC optimizations you can make - refer to this page for more details.
You'll also need to set up your input. You'll have to select what controller to emulate - for most games, emulating the Gamepad will be fine. You'll also have to select a controller API - if you use a keyboard, select keyboard. If you use an XBOX controller or something similar, select XInput. If you want to use a Nintendo Wiimote, then...you get the idea. Don't bother with DirectInput unless you know what you're doing - it's generally an inferior version of XInpute.
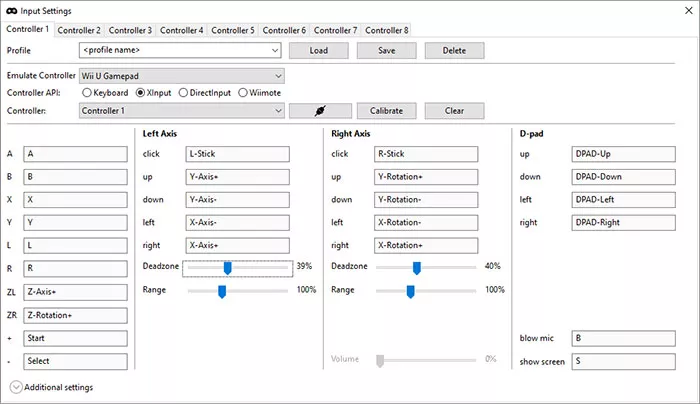
Once you've done that, you'll have to actually set the buttons. Click on each of the buttons and then press the button on your controller. If you use a controller or a joystick, then you'll also want to set the dead zone and range until it feels right.
2. Getting games
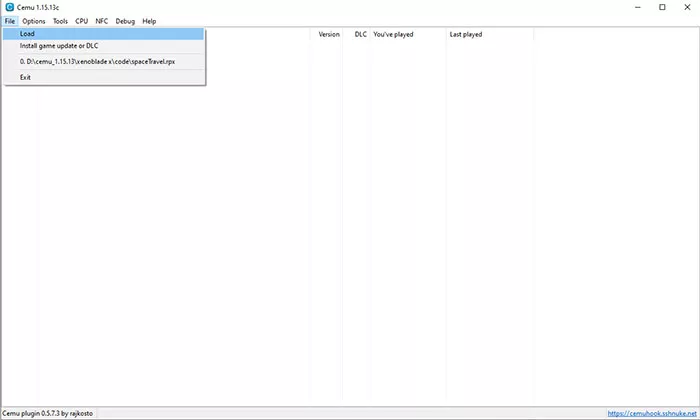
You'll need to obtain the images of the Wii U games you want to run, then load them by clicking on File and Load.
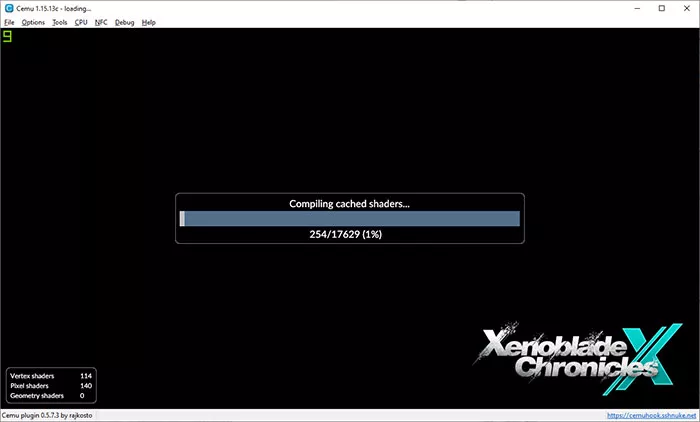
After you do that, the game will automatically startup. However, assuming you've never run the game before, the game will constantly stutter and pause every once in a while. That's because Cemu has to load the shader for each effect and shadow the game has every time you trigger it. For instance, if you're playing Breath of the Wild and you attack an enemy, the emulator will have to load the shader for the particle effect that happens. You can imagine that this will happen countless times, and having the game pause for a few seconds every time they have to load makes the game unplayable.
To fix this problem, you'll need to download the shader cache for the emulator so it doesn't have to do that. To do so, go to this link. Once you've downloaded a cache, you'll need to install it into the emulator.
First, you need to run the game you want to install the shader cache for once. That will create a .bin file with an incredibly long string of text. You'll need to then uncompress the shader cache you downloaded into the cemu\shaderCache\transferable. Make sure that long string of letters the shader cache has matches the name of the .bin file - the emulator won't recognize it without that.
You'll know you did it right when you try to run the game and a screen comes up telling you that it's compiling the shader cache.
There may be a few problems, though. If your game still stutters like mad after it compiles all the shaders, then there are a few tricks you can try. Close Cemu and go to the precompiled folder located in \ShaderCache\precompiled. Delete the file for your save and relaunch the game. This will create a new save for your game and Cemu should have to recompile the shaders from scratch.
As you can see, there are so many things about this emulator that are finicky. However, you'll be able to play a ton of Wii U games, which had a ton of first-party games that were fantastic.